The KroozSD board now comes with a handy SWD connector, a simple 3 pin 1mm JST located in the middle of the board. As debugging is one of the harder aspects of embedded development the connector has always been an interesting addition but finding a way to interact with the port has proved tricky.

While I have several devices that claim to offer the required interfaces, none of them have proved to be supported. However, I came across an article explaining both how to build the required software but also how to physically connect the port to a RaspberryPi yesterday and so less than an hour later I was trying to figure out SWD!
Physical Connections
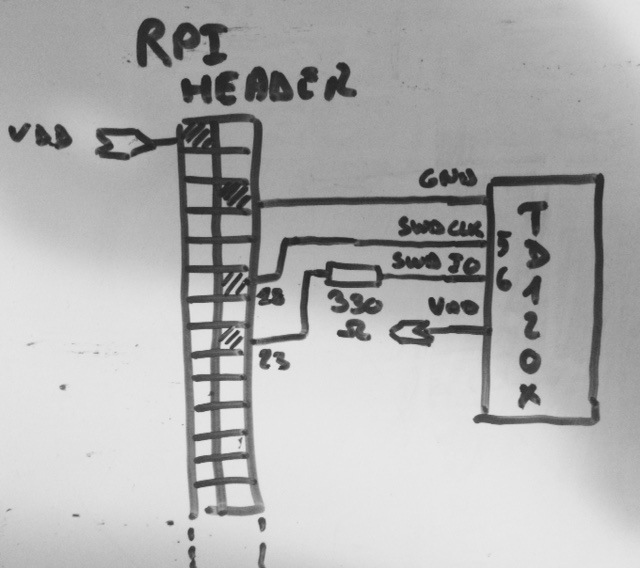
Figuring out how to connect the SWD pins to the RaspberryPi was my first challenge. Thankfully this post gave a diagram , which while not as clear as it could have been gave me sufficient information to make a start. I used a small breadboard to allow me to put the resistor inline and attached it to the RaspberryPi via some jumper cables.

Now the port was attached, it was time for the software.
Software
This Adafruit article provided exactly what I needed to build OpenOCD on the RaspberryPi. The instructions aren’t hard to follow but I ignored the part about connecting the device as I had already done that and the configuration section wasn’t relevant for the STM32 board.
As per the Adadfruit tutorial, I saved the config shown below to openocd.cfg.
source [find interface/raspberrypi2-native.cfg] transport select swd set BSTAPID 0x06413041 source [find target/stm32f4x.cfg] reset_config srst_only srst_nogate init targets
After saving the file I then just ran openocd 🙂
Hello?
Initially there were just invalid responses, so I used a small connector to force the board to boot using the builtin ST bootloader rather than the Krooz bootloader (UART 3 SYS pin connected to the +3.3V pin). This brought the board to a simplified state and enabled SWD. When running this time things looked a more encouraging.
pi@raspberrypib:~/swd $ sudo openocd Open On-Chip Debugger 0.10.0-dev-00319-g9728ac3 (2016-05-22-19:00) Licensed under GNU GPL v2 For bug reports, read http://openocd.org/doc/doxygen/bugs.html BCM2835 GPIO nums: swclk = 25, swdio = 24 BCM2835 GPIO config: srst = 18 srst_only separate srst_gates_jtag srst_push_pull connect_deassert_srst adapter speed: 2000 kHz adapter_nsrst_delay: 100 srst_only separate srst_nogate srst_push_pull connect_deassert_srst cortex_m reset_config sysresetreq srst_only separate srst_nogate srst_push_pull connect_deassert_srst Info : BCM2835 GPIO JTAG/SWD bitbang driver Info : SWD only mode enabled (specify tck, tms, tdi and tdo gpios to add JTAG mode) Info : clock speed 2002 kHz Info : SWD DPIDR 0x2ba01477 Info : stm32f4x.cpu: hardware has 6 breakpoints, 4 watchpoints Error: stm32f4x.cpu -- clearing lockup after double fault Polling target stm32f4x.cpu failed, trying to reexamine Info : stm32f4x.cpu: hardware has 6 breakpoints, 4 watchpoints TargetName Type Endian TapName State -- ------------------ ---------- ------ ------------------ ------------ 0* stm32f4x.cpu cortex_m little stm32f4x.cpu halted
I will admit the first time it ran successfully I was a little surprised and wondered what to do next, but some quick searches revealed the answer!
SWD Adventures
Given my RaspberryPi is running without a screen or keyboard, the simplest way to access it is via a remote connection. OpenOCD provides just such a connection via a telnet connection, so on my laptop it’s simple enough to gain access.
$ telnet 192.168.1.95 4444 Trying 192.168.1.95... Connected to 192.168.1.95. Escape character is '^]'. Open On Chip Debugger >
I’m primarily interested in programming the flash memory, so I started by trying to get information about that.
flash info 0 Device Security Bit Set #0 : stm32f2x at 0x08000000, size 0x00100000, buswidth 0, chipwidth 0 # 0: 0x00000000 (0x4000 16kB) protected # 1: 0x00004000 (0x4000 16kB) protected # 2: 0x00008000 (0x4000 16kB) protected # 3: 0x0000c000 (0x4000 16kB) protected # 4: 0x00010000 (0x10000 64kB) protected # 5: 0x00020000 (0x20000 128kB) protected # 6: 0x00040000 (0x20000 128kB) protected # 7: 0x00060000 (0x20000 128kB) protected # 8: 0x00080000 (0x20000 128kB) protected # 9: 0x000a0000 (0x20000 128kB) protected # 10: 0x000c0000 (0x20000 128kB) protected # 11: 0x000e0000 (0x20000 128kB) protected STM32F4xx - Rev: Z > flash banks #0 : stm32f4x.flash (stm32f2x) at 0x08000000, size 0x00100000, buswidth 0, chipwidth 0
One thing that did catch me out initially was that this is just a telnet session, so any files that I referenced needed to be on the RaspberryPi not my local machine. Once the required files were transferred across it was time to update the firmware. Thankfully OpenOCD provides a simple way to do this.
program ap.bin erase verify 0x08004000 adapter speed: 2002 kHz stm32f4x.cpu: target state: halted target halted due to debug-request, current mode: Handler HardFault xPSR: 0x61000003 pc: 0x2000002e msp: 0x2001fff0 adapter speed: 4061 kHz ** Programming Started ** auto erase enabled stm32x device protected failed erasing sectors 1 to 5 embedded:startup.tcl:454: Error: ** Programming Failed ** in procedure 'program' in procedure 'program_error' called at file "embedded:startup.tcl", line 510 at file "embedded:startup.tcl", line 454
It makes sense to now allow the device to be programmed while locked, so to unlock the device, the command is stm32f2x.
stm32f2x unlock 0 stm32f2x unlocked. INFO: a reset or power cycle is required for the new settings to take effect. > reset halt adapter speed: 2002 kHz stm32f4x.cpu: target state: halted target halted due to debug-request, current mode: Handler HardFault xPSR: 0x61000003 pc: 0x2000002e msp: 0x2001fff0
Now the device is unlocked, I can try programming again.
program ap.bin erase verify 0x08004000 adapter speed: 2002 kHz stm32f4x.cpu: target state: halted target halted due to debug-request, current mode: Handler HardFault xPSR: 0x61000003 pc: 0x2000002e msp: 0x2001fff0 adapter speed: 4061 kHz ** Programming Started ** auto erase enabled wrote 245760 bytes from file ap.bin in 5.491092s (43.707 KiB/s) ** Programming Finished ** ** Verify Started ** verified 153560 bytes in 0.333037s (450.283 KiB/s) ** Verified OK **
Now that it has programmed, time to lock the device again!
stm32f2x lock 0 stm32f2x locked
Conclusion
I’m sure there is a lot more that I can do with SWD and I now have a way of connecting and using it. Sadly I’m no further forward with getting the board working 🙁